

how to install delta shower valve rough in
Bert spent 25 years working as a home-improvement and residential construction contractor in central Florida.
Many homeowners make the decision to replace their old single-handle shower valve after removing the wall tile during a shower remodel and discovering a sickly looking green corrosion covering the valve body and the copper pipes connected to it. Nobody wants to spend the money and time replacing wall tile only to have a water pipe spring a leak a couple of months down the road. While often left to a professional plumber, many DIY homeowners complete this project without any problems in a couple of hours.
Replacing this worn shower valve with a modern model helps complete the bathroom remodeling project.
Bert Holopaw
Repair or Replace?
Repairing a shower valve sometimes makes sense. A shower valve that drips water out its tub spout usually needs a replacement cartridge. Many single-handle shower valve models use a retaining nut to hold the cartridge in place. Simply remove the retaining nut and pull the old cartridge out with pliers.
How to replace the cartridge:
A brass retaining pin, located on top of the valve body, holds a single-handle Moen cartridge in place. Grip the retaining pin up with a set of pliers and pull it out of the valve body, being careful not to drop the pin into the wall cavity. Pull the cartridge with a Moen cartridge-extractor tool. Lubricate the cartridge's O-rings with a small amount of plumber's grease and push it into the shower valve.
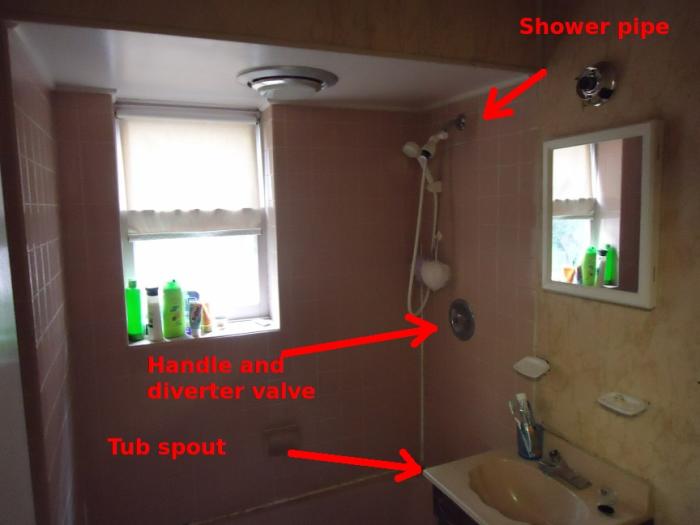
A typical shower layout.
By Tomwsulcer (Own work) [CC0], via Wikimedia Commons
How a Shower Valve Works
A cold-water pipe attaches to the valve's left port and a hot-water pipe connects to the right port. The top port sends water to the shower head and the bottom port, if applicable, feeds the tub diverter or spout. A shower-only valve utilizes three ports: left, right and top. When using a 4-port valve in a shower-only application, plumbers cap the bottom port. The valve's cartridge controls water flow through the system. An anti-scald device automatically changes the hot-to-cold water ratio, preventing dangerously hot water from burning the user.
How to Remove the Old Shower Valve
- Turn off the water to the home at its source.
- If the house uses a well pump, turn off the pump motor's circuit breaker. If the building connects to local water, close the water system's main valve.
- Turn on the existing single-handle shower valve. This releases any water pressure in the pipes.
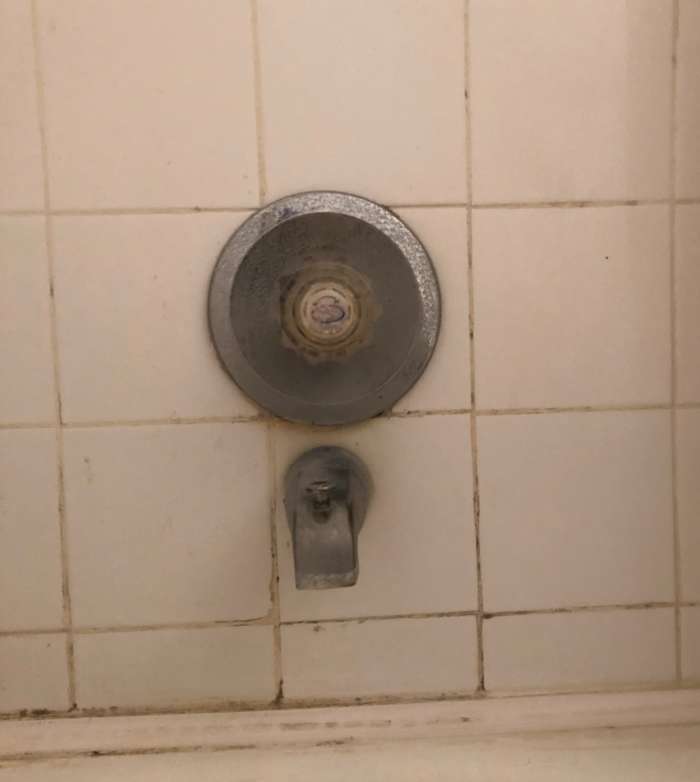
- Locate the shower knob's set screw, either found under a decorative cap or exposed underneath the handle. Loosen the set screw with the appropriate tool, usually either a Phillips screwdriver or a hex-head wrench. Pull the knob off the shower valve. Remove the trim plate's screws and pull the plate away from the wall tile, exposing the old valve body. If old caulking locks the plate in place, use a screwdriver to separate the trim plate from tile.
- Look at the bottom of the tub spout to determine its removal method. Some tub spouts thread onto a pipe with male threads, however, others are held in place with a clamp that pinches the pipe. Pinch-clamp tub spouts use a small access hole underneath the spout to remove the camp.
- Slide the appropriate tool, usually either a Phillips screwdriver or hex-head wrench, into the hole and loosen the clamp. Pull the tub spout off the pipe. Tub spouts without access holes spin onto threaded pipe. Grip the tub spout and twist it counterclockwise. Often corrosion locks the threads together and requires pliers for separation.
- Hold the shower arm still with a set of pliers and turn the shower head counterclockwise. Remove the old showerhead, then slide the escutcheon off the shower arm. Unscrew the shower arm, using the pliers for leverage, from the threaded elbow located inside the wall.
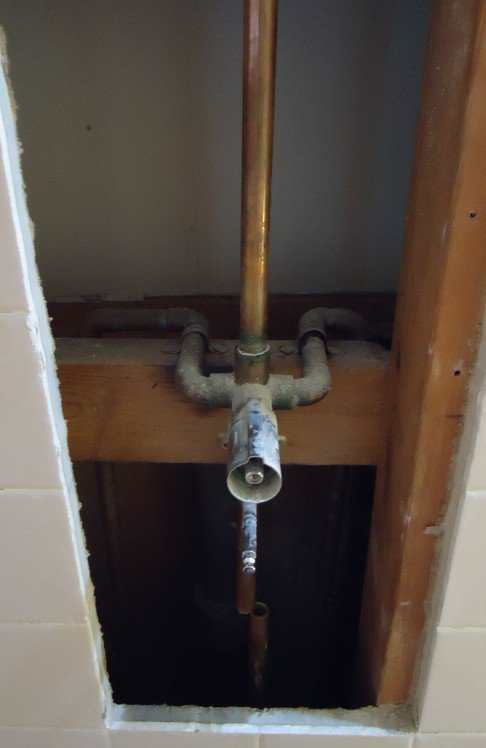
A typical older shower valve installation.
By Tomwsulcer (Own work) [CC0], via Wikimedia Commons
8. How to access a single-handle shower valve depends on the type of project involved. During a complete renovation, contractors often remove everything against the wall studs, leaving nothing but completely exposed plumbing pipes and wires. Smaller jobs might only need a few wall tile replaced. When trying to save the tile, consider opening up the wall on the opposite side as the shower valve. An opening in a closet's drywall sometimes makes an easily repairable access point.
9. Remove the section of wall needed to expose the valve and plumbing pipes. Take note of the water pipe's route and any obstructions in the way. The new valve and all pipes connect the same way. Look for leaking pipes and signs of water damage. If the pipes do not show signs of leakage, but the wall studs have water damage near the floor, inspect the tub or shower's drainage system. A tub's shoe gasket, the gasket between the bottom of the tub and the drain pipe, often deteriorates over time.
10. Cut the hot- and cold-water pipes, along with the pipe heading toward the shower arm. Make the cut at least one full inch above any remaining fittings or obstruction. Leaving more than the minimal one inch makes the repair connections easier. Use the proper tool: A copper-tubing cutter scores through copper pipes without deforming the pipe, while a ratcheting pipe cutter neatly slices through plastic pipes. Loosen the clamps or screws holding the valve against its backing block, the horizontal bracing securing the valve body. Pull the old valve from the wall cavity.
By Tomwsulcer (Own work) [CC0], via Wikimedia Commons
How to Install the New Shower Valve
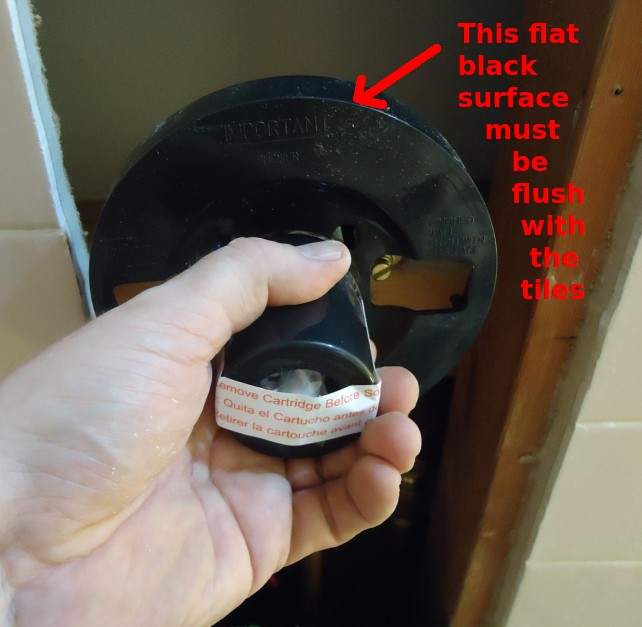
1. Hold the new shower valve against the back bracing. Verify its depth guide, the round plastic shield attached to the valve's face, sits flush with the wall tile's surface. Adjust the back bracing as needed. If the back bracing sits too far back into the wall, add the proper thickness shim to the back bracing. If the back bracing sits too far forward, remove it and reattach it to the wall studs in the correct position. Often a strike with a hammer moves the bracing enough.
2. Remove the depth guide. Valves with threaded ports require less plumbing skill than brazed ports. When using a valve with threaded ports, simply cover the male threads with a thread sealant and install the appropriate threaded pipe fitting onto the valve body. If the valve body brazes directly onto copper water pipes, remove the cartridge and use a torch to attach a short section of pipe to the valve body. Mount the new valve against the back bracing.
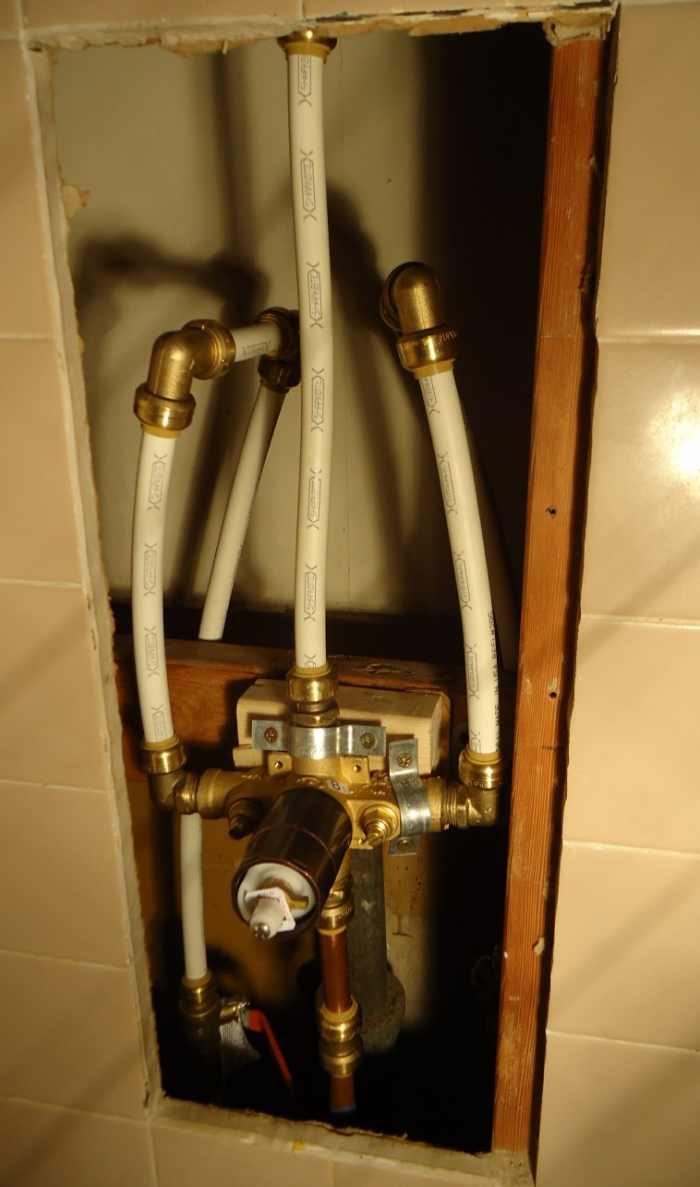
This shower valve has threaded ports and uses push-on plumbing fittings.
By Tomwsulcer (Own work) [CC0], via Wikimedia Commons
3. Clean the ends of the building's water pipes, using the appropriate method. Emory cloth removes corrosion from copper pipes, while a chemical cleaner preps plastic pipe for the adhesive cement. Attach a coupling to the building's hot and cold water pipes. Modern push-on plumbing fittings cost more, but require less plumbing know-how and tools than either copper, CPVC or PEX pipe. A push-on fitting easily transitions from rigid copper to a flexible type of pipe, such as PEX. Copper fittings need flux, solder and a torch. A specialized tool secures a ring or clamp on PEX and poly pipe fittings. Coat CPVC pipe and fittings with the correct cement. Run the water pipes to their respective ports. The type and placement of the fittings depends on the valve's placement in the wall.
4. Install a cap on the tub stem and close off the shower port. Both ports use 1/2-inch fittings. Turn on the building's water supply and leak test the shower valve. Turn off the water and repair any leaking fittings found.
5. Replace the single-handle shower valve's depth guide. Repair or install the shower's wall board and tile. Cut the tile tight to the depth guide. This ensures the valve's trim package covers the opening in the wall tile. Grout and clean the shower walls.

By Tomwsulcer (Own work) [CC0], via Wikimedia Commons
6. Check the new tub spout's installation method. A spout with female threads requires a pipe that ends with male threads. Apply thread sealant to the male threads and tighten the tub spout. A spout with a locking clamp slides over a bare pipe. An o-ring seals the connection. Tighten the clamp. Cover the shower head's wall tube with a thread sealant. Install the wall tube and shower head.
7. Remove the depth guide. Install the shower valve's trim package and handle, following the manufacturer's instructions. Some installers place a small bead of caulking along the escutcheon's outside edge before sliding it against the tile. This helps prevent moisture from entering the wall cavity.
This article is accurate and true to the best of the author's knowledge. Content is for informational or entertainment purposes only and does not substitute for personal counsel or professional advice in business, financial, legal, or technical matters.
© 2016 Bert Holopaw
how to install delta shower valve rough in
Source: https://dengarden.com/home-improvement/How-to-Replace-a-Single-Handle-Shower-Valve
Posted by: varnelllestout1989.blogspot.com
0 Response to "how to install delta shower valve rough in"
Post a Comment